AMATEUR ASTRONOMY SITE
Javier
Gómez Laina
DESIGNING
AND MAKING A 18" (457 mm) DOBSONIAN TELESCOPE
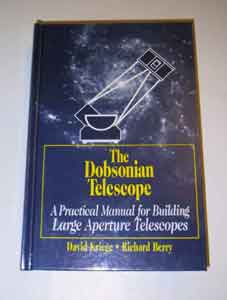 In 1998 was published "The Dobsonian
Telescope" (David Kriege, Richard Berry. Ed. Wilmann-Bell), an
authentic handbook for making, step by step, large amateur telescopes,
based on well-known Obsession's design. Information contained in the
book is very complete and really useful, rigorously studying the
different design alternatives this kind of telescope has had last
years, having allowed to amateur astronomers accessing to large
apertures that were inaccessible years back.
In 1998 was published "The Dobsonian
Telescope" (David Kriege, Richard Berry. Ed. Wilmann-Bell), an
authentic handbook for making, step by step, large amateur telescopes,
based on well-known Obsession's design. Information contained in the
book is very complete and really useful, rigorously studying the
different design alternatives this kind of telescope has had last
years, having allowed to amateur astronomers accessing to large
apertures that were inaccessible years back.
I
suggest to any people interested in making a large Dobson telescope to
buy this book (in Spain, you can buy it at ORYX bookstore, phone 93
4185511). Obviously, the book is English written, but it
has a lot of schemes, plans and photos that make it very
comprehensible, even for people with basic English knowledge.
Given
the multitude of aspects that there are to consider for an appropiate
design of a telescope of this characteristics, as well as this web page
limited purpose, it has been written assuming that interested people
has actually the book, so that I will only consider those aspects that
are not sufficiently considered in the book.
1.-
PREVIOUS CONSIDERATIONS
Primary
mirror diameter election
Large
Dobsonian’s best benefits are obtained on deep sky objects, so that we
could always say that bigger is better; however, it’s necessary to
consider some aspects ( in addition to purely budget-concerning ones
that, because they are so obvious, I don’t discuss):
-
Telescope frame: This design is a truss tube telescope, that allows
telescope disassembling for traveling to observation sites. This
kind of structure is very rigid, although I consider that its
advantages become evident for diameters from 300 mm (12”); for smaller
mirrors it is usually better to use a simple tube.
-
Dimensions and weight: Although this kind of design allows making “Big
Ones” up to 36”, it’s necessary to notice that:
Diameters
up to 350mm (14”): The telescope can be carried by yourself in a normal
car, being able to be transported through a building stairs (although
with certain difficulty).
Diameters
up to 450mm (18”): You need a big car (wagon station, pick-up, …), with
flat charge surface , or a tow. Its handling in building
elevators or stairs is almost impossible.
Diameters
of 500mm (20”) and bigger: I adddition to the transport problems (tow
use is imperative), it must be warned that these telescopes can not get
through normal 70cm wide doors, so that it can not be kept, nor
constructed, in a house, but in a garage, shed or similar; moreover,
it’s necessary to use a big ladder for observing.
Telescope
design
Once
you have selected the primary mirror diameter, we have to carry out the
design of all elements of the telescope; using Autocad (or similar CAD
software) will be things easier. You have to be very careful at
this phase, verifying many times all the dimensions and checking if the
telescope will be able to get through home’s doors and transported in
your car.
Ordering
optics
At
this moment we can order optics. You have to realize that delivery
times on large mirror are about one year; so, we will be able to make
telescope parts calmly, leaving only final adjustments for being made
when optics arrive.
2.
- MATERIALS AND TOOLS
Almost
all materials used have been Kriege & Berry’s suggested. A
very important issue is the correct election of laminated wood that are
going to be used in critical telescope parts.
I
have used Baltic (Finnish) Birch, 15mm (11 layers) and 5mm (9 layers)
thick; the last one is really a wonderful material, although very
expensive (about 60€/m2). When buying wood you have to consider
that cuts made by warehouse supplier are not exactly perpendicular, so
that you have to ask for wood pieces with certain margin, for carefully
cutting them later.
I
have to advise you that I don’t like the procedure described in the
book for sticking large wood pieces in order to obtain a greater
thickness ones (raising a vehicle for supporting a wheel over pieces),
because there are wheel displacements when the car is being leaned on
wood, and pressure is only done over contact zone with wheel. I have
preferred to use clamps for it.
Necessary
tools, in adittion to small basic ones (screwdrivers, hammer, file, …)
of a small home workshop, woul be:
Precision
framing square, essential for obtaining perpendicularity on wood cuts.
Tube
cutter (it is worth to use a quality one)
Column
drill (however, you could use carefully a manual one)
Forstner
drills
Router
Welding
machine
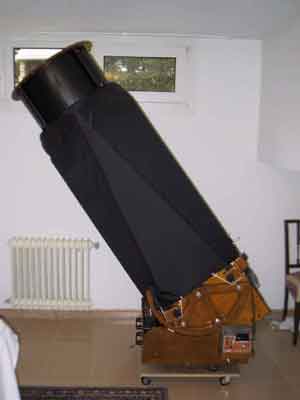
3.-
TELESCOPE MAKING
I
have basically followed the methodology described in the book, although
I have introduced small modifications, that I believe slightly improve
the telescope’s observing perfomance. Next, I will describe step
by step suggestions for each telescope part.
Mirror
cell
Book’s
description for its accomplishment is very complete. I have use a
vehicle safe belt as mirror belt, since its streching under small loads
is practically null. Its is very advisable using a wood model for
positioning and attachment of the mirror cell steel structure for
welding.
Mirror
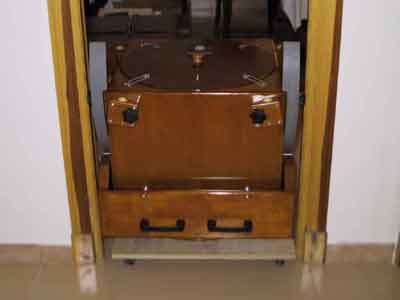
box
Cover
attachment has been made by small trunk closings, although I have had
to increase the hoops with wire; thus it is avoided a possible falling
on the primary of inner attachment systems (magnetic or similar).
There is a level bubble stuck (assured with foam) on the box cover, for
an easier telescope positioning.
I
have put an inner Kydex baffle, covered with flat black velour paper,
that is fastened with small nails on the inner box corners’
reinforcements. On the box bottom, there is also a Kydex baffle (velcro
fastened) that avoids light passing whereas allowing air current for
mirror cooling.
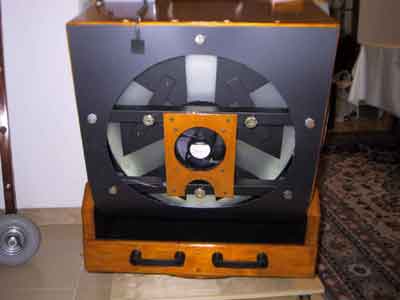
Secondary
cage
Most
focusers' design implies that drawtube gets inside the telescope tube;
I have put a wood supplement for avoiding that. Into this
supplement there is guides for a filter sheet, with an Lumicon OIII 2”
filter. I find this accesory very useful, because it avoids to remove
the eyepiece for filter threading; moreover, by this way the filter is
not directly exposed to the outside ambient, so that dewing is delayed.
Wood
rings have been bored for decreasing weight (always a critical aspect
of the secondary box); I have had a 300g (0.66 pound) saving, although
rings varnishing has been very hard.
On
secondary box’s inner surface I have placed flat black velour paper,
whit superb characteristics for avoiding any light reflection.
There is also wires for powering heaters on eyepieces, finder and
secondary mirror. Power is obtained from battery using two truss
tubes like current conductors.
Bearings
Altitude
bearings design has been basically made taking care of their aesthetic,
although without stiffness reduction; however, cutting and varnishing
work has been considerably increased.
Regarded
formica, in Spain there are not Stardust neither Ebony Star commercial
brands, so that I chose a medium roughness one, although I think that
this is not a critical design issue. You are advised that formica is
only sold by large dimension sheets (about 3 x 1.5 m). You must
take care cutting formica, because it is an extremely fragile
material; I suggest to cut greater formica pieces, sticking them
to wood with carpenter’s glue and then trimming them carefully with a
router.
I
have used 3mm thick Teflon, fastened by screws. In order to
assure an uniform contact between bearing and teflon surfaces, teflon
pads have to be sandpapered until getting a perfect contact; for that I
have used a bearing as a tool, sticking sandpaper on its surface with
double-side sticky tape.
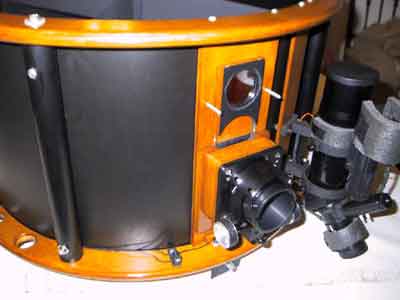
Truss
Tubes
Several
ways for the secondary cage attachment to truss tubes are described in
the book. I have chosen that is observed in the photography, with
two aluminium 3mm thick sheets sticked; by this way, truss tubes are
connected by pairs on a single point, so that there is a great flexure
stiffness.

An
important issue is the aluminium sheets union to tubes; the best way is
to use threaded inserts, as described in the book: ingenious, simple
and very rigid. Nevertheless, I haven’t been able to buy them in
Spain, so that I had to order them to USA (material cost $6, shipping
costs $30!).
Tubes
are 30mm outer diameter, 1.5mm thick. I ordered them with
flat black anodizing (cost increment is very low). Covers are
flat black Armaflex, that is an air conditioning pipes isolating; their
main utility is to protect truss tubes during transporting as well as
to make easier the cover adjustment.
Two
of the tubes are used as electrical current conductors (+ and -) from
mirror box until secondary cage; for that I have instaled, by threaded
inserts, steel straps into tube’s bottom, that are supported into
tube’s cages by thin steel sheets connected to the batery.
Before
cutting the tubes, it’s necessary to leave a safety margin of about
50mm, so that you can cut it carefully later. At this moment it’s
convenient to have the eyepieces set that you will use with the
telescope; you can make preliminar calculations knowing that eyepiece’s
focus approximately corresponds with its stop field position. However,
some eyepieces (as TeleVue’s 31 and 22mm Nagler) have their focus
position over their focuser support, well inside the main body.

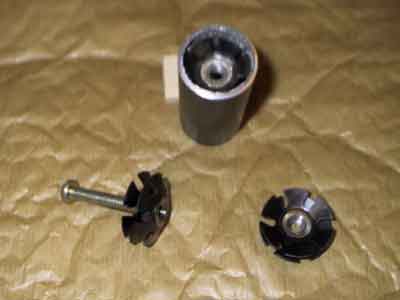
Tubes’s
split-block sockets
Several
types of these supports are described in the book; I have modified one
of them for an easier construction with my tools. The photography
shows one of them; I have made it with three pieces of 15mm thick
Baltic Birch that, once sticked ant drilled, conform the support.
I think that the result is both practical and elegant.
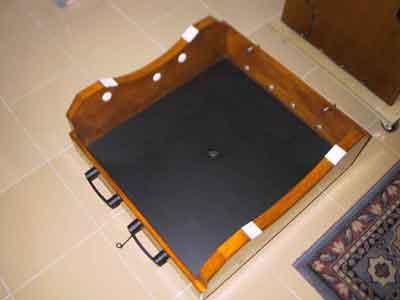
Rocker
box
I
have installed teflon sheets on the box inner sides, in order to avoid
hard rubbing between rocker and mirror box. The photography also shows
the rocker box handles to make easier its handling during transport.
In
order to obtain the azimut bolt bore, since box dimensions prevents the
use of a column drill, I have used carefully my router, with good
results.
Ground
board
I
have installed steel/rubber supports under azimuth teflon bearing; they
are threaded for telescope leveling.
Handles
These
are really a useful accessory: I had to make them folded, so that they
could be transported in my tow. I use one of the rocker threaded
inserts for fixing the battery support, so that its weight does not
affect the telescope balance.
Telescope
cover
Ripstop
nylon is known in Spanish tapestries as plasticized blak nylon. I
close the cover by means of metalic buttons, instead of a closed one,
so that it is not necessary to disassemble the finder to put the cover .
Other
items
I
always use a laser collimator; reaching a perfect collimation is a two
minutes task. Furthermore, mine is a cross-reticle one, that makes
easier to see the return laser beam on the collimator base.
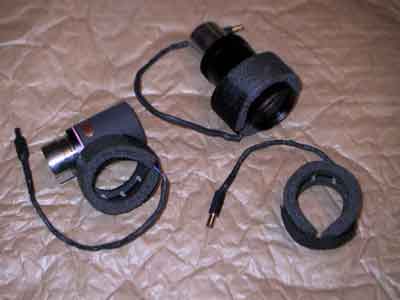
Another
useful accessory is eyepiece heathers, that will allow us observing on
wet nights (approximately half of them, by my own experience).
They are very simple to construct, using resistors and foam. I
use 3W power, in continuous DC mode, for 2” eyepieces, and 1.3W for
1.25” ones.
Finally,
I strongly advice you a Spanish old saying: “Make all experiments with
soda water” (instead of good wine); whenever we are not totally sure
about following steps, it is better to stop and meditate about its
consequences. For example, it is very useful to make a wood model
(ballasted with lead) of the primary mirror, so that you will be able
to practice the movements sequence for introducing it into the mirror
box.
Clear
skies.